Monday, August 30, 2010

Pink and Black... A Pretty Combination

Greetings! Today's card is fashioned after a card I saw on a blog a while back, and wouldn't ya know it, now I can't find her blog to give her credit?!  I copied the picture of the card to my hard drive, but she didn't use a watermark (which I don't... hmmm, maybe I need to start doing that).  Hers had a large scallop circle to frame her main image, which was the larger flower from the Vintage Vogue stamp set.  I took her design idea and made a few changes, particularly because I didn't have a large scallop circle handy.  I happened to have Melon Mambo and Basic Black card stock scraps on my desk, and thought I'd make a card using those colors. I had an extra Melon Mambo flower from the Greenhouse Garden stamp set already cut out, so I used it along with the branch from the bird punch to frame the sentiment. I've never been a big pink person, but I really do like the combination here!


Stamp Sets: Greenhouse Garden, Much Appreciated (retired)
Inks: Melon Mambo, Basic Black
Card Stock: Basic Black, Whisper White, Melon Mambo, Wild Wasabi
Accessories: Two-step Bird Punch, Polka-dot Melon Mambo Grosgrain Ribbon (retired)
Tools: Creative Memories Circle Cutting System, Stampin' Dimensionals

Thursday, August 26, 2010

Thanks for 'hopping' on over!

Hello!  Thanks for stopping by today as several stampers from Stampin' Addicts are going to share with you projects that they've created using products from the upcoming Stampin' Up! Holiday Mini Catalog.  If you happen to be joining in starting with my blog, be sure to click the link on the bottom to head over to the next stop on our blog hop.  If you arrived here after viewing Debra's projects, welcome!  I absolutely LOVE her Falling Foliage card and will be CASEing that one for the future (aka Copying And Stealing Everything).

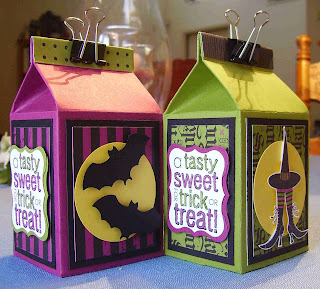
I chose to showcase a sentiments stamp set this time around, called Seasonal Sentiments.  This set has four sentiments, perfect for upcoming holidays.  Let's get started with the first - Halloween!  I had a lot of fun creating this project.  You've probably seen Becky Roberts' wonderful milk cartons around the web, and this is the fifth different version of one that I've made since purchasing her tutorial (very affordable, I might add).  I just love these cute cartons, and they were perfectly sized to show off the first stamp in my stamp set, don't you think?


Moving on to Thanksgiving, I ended up doing a staircase accordion card.  I really like this sentiment, but I'll admit, this is my least favorite of the four projects I made to share with you.  It just didn't gel as well as the others, and I ran out of time for a redo.  Then again, on the last hop, the card I put together at the last minute turned out to be a favorite for many of my readers, so maybe you'll like this one, too.


What's a seasonal sentiment set without a Christmas sentiment?  Stampin' Up! nailed this one for me, as I really love this one.  Can you keep a secret?  I signed up for a scrapbook swap over at Stampin' Addicts, and that deadline is coming up soon.  So, you're getting a preview of my Christmas 8x8 scrapbook swap!  Shhh, don't tell...


The final sentiment stamp in this set was actually the first one I used when starting to work on my blog hop projects.  It's a great Valentine's sentiment, but what's better, you could use this one any time of the year.


I hope you enjoyed my stop on the blog hop.  I've shared the details of my projects below, in case you are interested, but if you just want to head on over to Betty's blog next, that's ok with me because I know you are going to love what she's got planned for your viewing pleasure, featuring a new product for Stampin' Up!, fabric!


To Betty's Blog


Back to Debra's Blog


Halloween project
Stamp Sets:  Seasonal Sentiments, Wicked Cool
Card stock:  Basic Black, Old Olive, Rich Razzleberry, Daffodil Delight
Ink:  StazOn Jet Black; Old Olive, Rich Razzleberry Markers
Accessories:  Wicked Fun Specialty Designer Series Paper, Bitty Bat Punch, Curly Label Punch, 1 3/4 Inch Circle Punch, 1 3/8 Inch Circle Punch, 1 1/4 Inch Circle Punch, 1 Inch Circle Punch, Basic Black 1 1/4 Inch Striped Grosgrain Ribbon

Thanksgiving project
Stamp Sets:  Seasonal Sentiments, Autumn Splendor
Card stock:  Old Olive, Very Vanilla, Chocolate Chip
Ink:  Cherry Cobbler, Pumpkin Pie, Daffodil Delight, More Mustard, Old Olive, Chocolate Chip
Accessories:  2 1/2 inch circle punch, 5/8 Inch Daffodil Delight Grosgrain Ribbon, Greenhouse Gala Designer Series Paper, 2 1/2 Inch Circle Punch, Brown Watercolor Pencil

Christmas project
Stamp Sets:  Seasonal Sentiments, Dasher
Card stock:  Cherry Cobbler, Old Olive, Very Vanilla
Ink:  Cherry Cobbler, Old Olive
Accessories:  Jolly Holiday Designer Series Paper, Dotted Scallop Ribbon Border Punch, 2 1/2 Inch Circle Punch, Old Olive 1/8 Inch Taffeta Ribbon

Valentine's project
Stamp Sets:  Seasonal Sentiments
Card stock:  Baja Breeze, Soft Suede, Very Vanilla
Ink:  Soft Suede, Baja Breeze (marker)
Accessories:  Elegant Soiree Designer Series Paper, Decorative Label Punch, Dotted Scallop Ribbon Border Punch, Vanilla 1/8 Inch Taffeta Ribbon, Paper Daisies, Baja Breeze Reinker, Crumb Cake Deck the Halls Big Designer Button, Hemp Twine

Monday, August 23, 2010

Watermelon, Anyone?

Hi there! Thanks for stopping by today. I'm going to share with you a somewhat whimsical card I made, based on one Wendy Weixler did earlier this summer. I loved how she made the watermelon pieces from the wide oval punch, but I wanted to tone down the Whisper White rind that Wendy used, so I sponged the white oval with some Wild Wasabi ink before overlapping the ovals. I then trimmed them to the desired shape/size. I created the border first, then wondered what I was going to do with the rest of the card – and this is what I came up with! If I had a stamp that said 'Take a Bite Out of...' I would have used it above the word 'Summer'.


Stamp Sets: Season by Season (retired)
Inks: Basic Black (classic stamp pad and marker), Wild Wasabi
Card stock: Whisper White, Melon Mambo, Wild Wasabi
Accessories: Razzleberry Lemonade DSP (retired), double-stitched Wild Wasabi ribbon (retired)
Tools: Creative Memories Oval Cutting System, Wide Oval Punch, Scallop Circle Punch, Stampin' Dimensionals

Saturday, August 21, 2010

Paper Daisies a la My Digital Studio

I've had a card in mind ever since I made my new blog background, so while sitting down tonight, watching one of my favorite movies - While You Were Sleeping, I made a digital version of what I've had floating around in my head for the past month.  When I'm finished with making my blog hop projects (nearly done), and the three sets of 8x8 scrapbook swaps I have to mail out by mid September, I'll be able to sit down and make the real one.  Until now, the digital version will have to do!

Holiday Mini Blog Hop


Be sure to stop by next weekend for the Stampin' Addicts' Holiday Mini Blog Hop!  Twenty plus blogs featuring projects made with materials from the Stampin' Up! Holiday Mini Catalog (available September 1).  I'll be featuring four project ideas for using 'Seasonal Sentiments', which is, you might guess, a four stamp sentiment set for Halloween, Thanksgiving, Christmas, and Valentine's Day.  The blog hop runs throughout the entire weekend, starting Friday morning, August 27 and ending Sunday evening, August 29, so feel free to stop by anytime during the weekend to see what everyone has created.  Meanwhile, I'll have a new post on Monday for you to check out.  Hope to see you back here soon!

Friday, August 20, 2010

One Week Down...

Well, the first week of the 2010-11 school year is now officially over.  I have four classes of 8th grade science, and one of 7th grade science.  We had our Back to School night last night, and I had something happen that has never happened before (but explains a lot).  There are typically fewer 8th grade parents that show up for this event, so I wasn't too concerned with the low turnout from my second and fourth period 8th grade parents (first and third period had a pretty good turnout, but there were still a few empty seats).  My sixth period seventh grade parents start coming in, and as expected, it's standing room only - and it's HOT in my room.  The school district doesn't override the A/C system to allow it to come on at night, and even with both doors propped open, it was stuffy in there.  Not a breeze in sight, either.  It's almost time to start, and the room's full.  So, I have parents standing by my back door, near the eyewash and shower station, and I notice one of the dads back there is rather tall and hits the triangle pull handle to the shower.  Why he did what he did next, I don't know, but he actually TUGS on the handle, soaking the shoulder of the guy standing along the wall under the shower!!  What did he think was going to happen?  I'm just standing there, amazed, thinking to myself, 'what a DUFUS!'  I joked and said that if he was one of my students, he'd be on his way to the office with a referral for breaking his science safety contract.  The other parents laugh, he says his curiosity really got the best of him, apologizes, and starts cleaning up the mess he's made with paper towels that just so happened to be right near him.  It's time to start, I go through my 10 minute spiel about what their kiddo will be learning in my class, and I'm thinking, ok, who's dad was that?  So today, my sixth period seventh grade crew comes in, and I mention the incident, and one of the boys, whose name I learned within about the first 15 minutes of our first day (NOT a good sign), speaks up and says 'yeah, that was my dad' and I'm immediately thinking to myself, 'yep, the apple doesn't fall far from the tree...'.  23 years of teaching and I've NEVER had that happen before.  It also took this group of parents a bit to quiet down when it was time to get started, and their kids are no different - I'm already nagging at them to close their mouths and open their ears... this is going to be a LONG year, I can tell!

Monday, August 16, 2010

Finally... Greenhouse Garden!

Today's card is based on a card design by Silke Ludlow. It's the first time my Greenhouse Garden set has seen ink (it's terrible for a stamp set to sit on the shelf for two years, unloved!). It was tough to get the flowers done correctly without my stamp-a-ma-jig, which got left home. You see, the family took a quick overnight trip up to my FIL's 'cabin' up in the mountains. Not really a cabin – really a three bedroom second home, and it has a nice oval kitchen table, perfect for stamping (which I've done here many times before). My DH wanted our youngest DD, 12, to do a little astronomy with the telescope she won last year, so we headed up for the night. While she and dad were outside, oldest DD, 14, and I did some artsy stuff – she did some pencil drawings (loves to draw and has some talent, I might add) and I was busy making some cards. Anyhow, it was tough to line up the images for the two step stamping, but I finally got a few close enough. On all of the flowers, I stamped off once (stamped on my grid paper to remove some of the ink) before stamping the flower image onto Whisper White. The accent image is full strength ink. I'm so glad I threw in a package of aluminum circle tags, as I think it nicely finishes off the card, don't you?


 Stamp Sets: Greenhouse Garden, Best Yet (retired Hostess)
Inks: Daffodil Delight, Melon Mambo, Rich Razzleberry, Wild Wasabi
Card stock: Whisper White, Melon Mambo
Accessories: Clear Rhinestone Brads (medium size), Polka Dot Melon Mambo Grosgrain Ribbon (retired), Aluminum Circle Tag (small, retired)
Tools: Scor-Buddy, Paper Piercer, Stampin' Dimensionals

Thursday, August 12, 2010

Pretty Containers

Ok, as promised from yesterday, here are a couple of pictures of the stick containers I use in my classroom.  I've been thinking of covering them in some of our beautiful designer series paper for a couple of years now, and finally this year I actually got them done!  I ended up doing two more - one for paperclips, one for pens/pencils.  Aren't they pretty?


Wednesday, August 11, 2010

Ok, So Sometimes I'm Not So Observant...

...but I knew I really liked the Elegant Trio Stencil when I first saw it:


So, tonight I was making some simple wrappers to go around some large mouth plastic containers that I use on my desk at work (each holds one class period's worth of large colored tongue depressors, each with the name of a student in that particular class period, so I can randomly draw a stick to choose a student to answer a question - helps me to not always choose the kid with their arm up).  I have a LOT of retired designer series paper, so I thought using some of it to decorate these containers would be a great idea.  I happened to grab the plastic 12x12 scrapbook storage box that had some of my old favorites in it - Afternoon Tea, Bali Breeze, Petal Patch, Western Sky, Le Jardin and Enchante, to name a few.  Le Jardin and Enchante (same paper, different color schemes) coordinates with one of my favorite retired stamp sets, Carte Postale:


As I'm thumbing through the packs of Enchante and Le Jardin, I started to focus on this particular sheet:


Notice anything?  There's that gorgeous flower from the Elegant Trio Stencil!  Upon further examination, I also noticed the Fleur-de-lis on the paper, which of course matches the stamp set, which also matches the stencil:


Do you know how happy I am that I don't get rid of retired Stampin' Up! products?!  Next time I am working with the Elegant Trio Stencil, guess which papers I'm going to grab?  Your first two guesses don't count... :)  I'll post a picture of the finished canisters tomorrow as I only brought one home with me.

Monday, August 9, 2010

Ice Cream, Ice Cream!

I can't believe it took me SO LONG to mount and use the cute Sweet Scoops stamp set, available through August 31 in the Summer Mini!  Back in May, I saw this cute card on Lorri Heiling's blog, so I decided to CASE it (copy and steal everything).  I did use current ink colors on my card - Chocolate Chip, River Rock (stamped off once), and Pretty in Pink for the ice cream, and Crumb Cake for the cones.  I did make two modifications to make it a little bit my own.  First, I didn't like how Lorri's word window punches on the awning were rounded on the top edge, so I cut a strip of Regal Rose card stock just shy of 3/8 inches wide, slid the strip into the groove of the punch, and punched just one end.  I added adhesive, stuck it to the awning, then trimmed the edge at the top, continuing this to make my awning.  I made my card without looking at hers (she kindly gave the measurements of the awning and bottom piece, so I did have those to work from), and I ended up choosing the same white organza ribbon to finish the card.  I added some retired Rose 1/4 inch grosgrain ribbon glued to the center of the organza, so mine is a little different than hers (but not by much!).  I'm thinking now I should have used 1/4 inch Chocolate Chip instead - the rose kinda gets lost against the Regal Rose card stock.  This happens to me a lot after I've completed a card... 'what if I had just done THIS...'


Saturday, August 7, 2010

Lookie, Lookie!

A big THANK YOU to Renee! She shared with me how to put a signature image at the end of my posts. Renee is one VERY talented stamper, so be sure to check out her blog, Stamping for Sanity. Thanks again, Renee!

Wednesday, August 4, 2010

Scheduled Posting

To keep my blog posts a little more regular, I am going to schedule posts for Mondays when I have something to share.  I'm hoping that this will help me get four new cards/projects posted each month and do a better job of keeping my blog updated.  I've already got this coming Monday's post ready to go, so now I can work on the rest of August.  After organizing my stamps this summer, I really want to start using some of those stamp sets that are still current but haven't seen any love yet.  I have SO much retired paper, I think I'm going to try to use a retired color (or two) on every other project to help use it up.  We'll see how that goes!

Tuesday, August 3, 2010

Just Because...

I've had a card in mind for a while, and today I spent time working on it.  Everything in the scene, except for the reeds, was sponged.  I hope it looks like a little swamp or bog with cattails by it at sunset.  I used Marina Mist and Pacific Point to create the water, and Daffodil Delight, More Mustard, and Pumpkin Pie for the sky.  The setting sun was sponged in Pumpkin Pie and then some Daffodil Delight over the top.  The land around the water was first sponged on with some Chocolate Chip ink, then covered over with Old Olive.  The reeds were then stamped over the image in Old Olive ink.  I used the slot punch and a scrap of card stock to sponge on the cattails (in Chocolate Chip).  I had planned for this card to be a standard 4 1/4 by 5 1/2 inch, but while sponging the far right cattail, I accidentally smeared some Chocolate Chip ink on my image, so it's now covered up with the scallop circle and sentiment.  The card now measures 5 1/4 by 5 1/4 inches as a result.  I made it for my DH as he's been so wonderful this summer while we've been on break from work.  He does a great job of making me feel loved and appreciated, and I wanted to make a special card for him to let him know I appreciate him, too!  Here's the card I made for him:

Monday, August 2, 2010

Drumroll, please!

First, I'd like to thank everyone who left me a comment about my stop on the Stampin' Addicts New Catty Mega Blog Hop!  I love being off from work and having the time to create.  As promised, I went to random.org today to choose the winner of my blog candy.  Without further adieu,


After counting down the comments list, I found that the winner is a fellow Stampin' Addict:


Congrats, Adriana!  Please email me at lovetostampandscrap@yahoo.com (or pm me over on SA) with your choice of an individual stamp from either the new IBC or Holiday Mini.  Thanks, everyone, for playing along.