Thursday, July 29, 2010

Welcome to the Stampin' Addicts New Catty Mega Blog Hop!!


Hi there!  I'm SO glad you are here!  If you are starting with my blog, I invite you to sit back, relax, and enjoy the things I've created for the blog hop.  After looking over what I've created, you'll find a link at the bottom of this post to take you to the next stop on our tour through the new Idea Book and Catalog, where Dawnmarie will share with you what she's created using Cottage Garden.  If you arrived here from following the link from Debra's blog, welcome!  Weren't her ideas for using Ornate Blossom great?  I'm featuring Friends Never Fade which has a smaller version of that blossom in the set.  All of my projects also use my favorite designer series paper from the new catty, Greenhouse Gala.

My first project is a simple box that you could use to wrap up a small gift or treat in.  I used Chocolate Chip card stock for the base of the box, and some Greenhouse Gala DSP for the lid.  The belly band is one of our new In Colors, Pear Pizzazz, along with some coordinating Greenhouse Gala DSP.  I stamped the flower image in Daffodil Delight, using two flowers to get a three dimensional look to it by cutting part of the petals off from the top flower and then curling them upwards.  The flower center was made by stamping the flower image in Chocolate Chip, then trimming out the center and adhering it onto the Daffodil flower.  I used the Sizzlets die Scribble Swirls to accent the flower.  Wouldn't this be a nice way to present a small gift to someone?


My second project is a simple card.  I used Pumpkin Pie card stock for the card base and more Greenhouse Gala DSP to go along with the flower image.  I colored the flower image with Pumpkin Pie and Pear Pizzazz markers, 'huffed' to remoisten the ink, then stamped onto Whisper White.  Those are Pumpkin Pie brads next to the flower.  The sentiment stamp comes from a set that's been around for quite a while, Short and Sweet, and is stamped in Chocolate Chip ink over the small ornate blossom image, which was stamped using Pear Pizzazz.  Those who know me well know that I can't just leave the scallop circle as is - I either use a gel pen on it as I did here, or sometimes I'll use my paper piercer or my 1/16 inch hand punch to make small holes where the white dots are.


Next up is actually the first thing I created for this blog hop, a card that I'm really proud of.  Like many stampers, I find inspiration for card making by looking at the work of others.  This time around, I was inspired by a card designed by Silke Ludlow (I'll add a link to her card after the hop).  I used her card design as a start, then added the colors and images I wanted to use.  My favorite color combination right now is Pear Pizzazz, Marina Mist, and Chocolate Chip, so that's what I used for my card.  The card base is Marina Mist, which I covered in Marina Mist ink using the Baroque Border wheel.  I stamped the flower image with Marina Mist, and then again two more times without restamping.  I then cut out the three flowers for the focus of my card and popped two of them up with dimensionals.  I used my Circle Scissors to make the circles that the flowers are mounted on - I've had it for a long time, but this was the first time I used it, which turned out to be very easy (when I need circles, I typically grab the circle/oval cutting system by a certain scrapbooking company that my DH bought me for Christmas a long way back, but I wanted to use only Stampin' Up! tools on this).  One technique that adds to the look of a card and that I often overlook is scoring.  I scored two lines on all sides of the Whisper White piece and put a silver brad where the lines overlapped.  Scoring just gives a sense of elegance to a card for me.  Not a card you'd probably want to mass produce, but I really do like it.


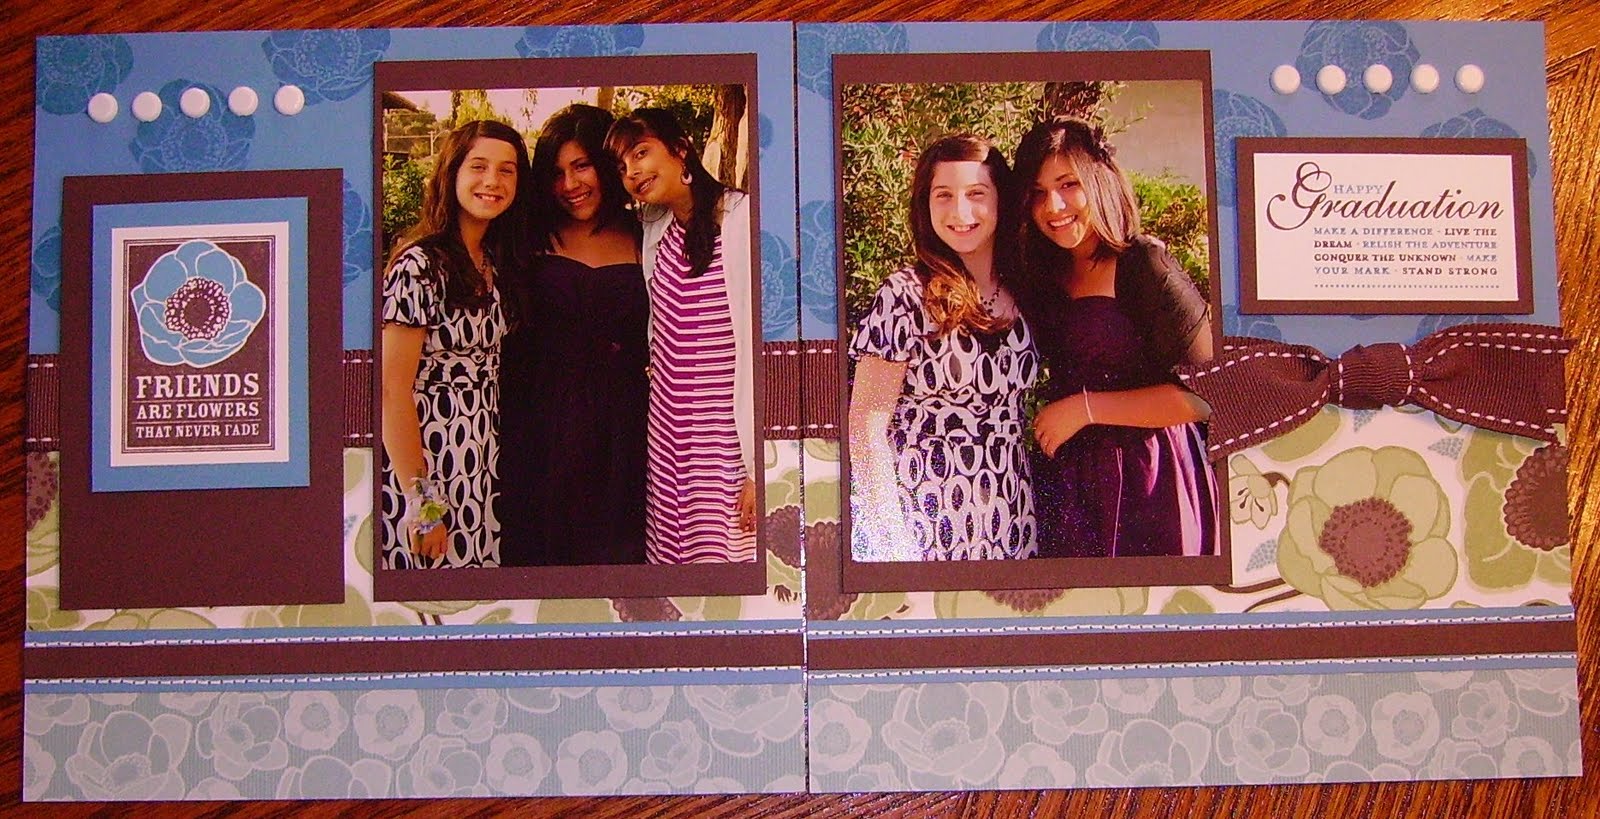
My last project is a remake of a 6 x 6 scrapbook layout I made earlier this summer.  The original started out with a PageMaps sketch (another place I visit when I need scrapbooking inspiration).  As I moved card stock and designer paper around, it evolved to my own creation.  This time around, I decided to step it up to 8 x 8 as Stampin' Up! is going to be offering two 8 x 8 albums with the new Holiday Mini catalog.  Our youngest recently graduated from sixth grade at our church's elementary school.  She's been there since she started preschool when she was three, and her class has been a close-knit group.  It was really tough saying goodbye, as they'll be going to different middle schools next year, so I wanted to create a special layout for her to remember two of her special friends.  I shared it with her when I was finished, and I got a HUGE hug from her.  It's the first time I've scrapped using the 8 x 8 size, and I think I'm really going to like that size.  I started with Marina Mist card stock, stamping the top half of each piece with the flower image from Friends Never Fade (also in Marina Mist).  I added the layers of Greenhouse Gala DSP and added a strip of Marina Mist card stock to do some faux stitching using my paper piercer and a white gel pen.  I then added the thin strip of Chocolate Chip card stock down the middle of the 'stitching'.  I love Chocolate Chip ribbon with this color scheme, so I added some wide stitched CC ribbon, which I just realized is now retired (sigh).  I stamped the 'Friends are Flowers That Never Fade' sentiment in Chocolate Chip ink, but instead of leaving the image as is, with a white flower at the top, I took the individual flower image from Friends Never Fade, stamped it in Marina Mist ink, cut it out and adhered it over the white flower.  The center is again added from the same flower stamped in Chocolate Chip and then trimmed for just the center piece.  The Happy Grad individual stamp from the Summer Mini catalog was a perfect sentiment for my page.  The only thing left to add is the school name, graduation date, and names of the girls in the pictures, but I'll do that after the blog hop.


To celebrate the arrival of the new catalog, I'm offering some blog candy.  To enter the drawing, simply leave me a comment on this post, telling me which project you liked the best.  I'll have random.org pick a winner for me on Monday, August 2.  The winner can choose one of the many single stamps SU! sells (from the Summer Mini or Idea Book and Catalog), valued at $9.95 or less, as their prize!

Thank you for looking over my stop on the New Catty blog hop.  It's time to head over to Dawnmarie's blog where I bet she's made some lovely things with Cottage Garden!

Shoebox Swap Card

Ok, this is the last of the cards I created for the CA Non-Convention Goers get-together that was canceled.  It features the beautiful Elegant Trio flower stencil.  I used sponge daubers to apply ink to the stencil, direct from the ink pad.  I started with Daffodil Delight, then added Tangerine Tango and Pear Pizzazz.  I accented the center using one of my favorite brads, Filigree, with a green rhinestone brad.  The designer series paper is my current favorite, Greenhouse Gala.  This was the shoebox swap card that I created for the gals to make had we gotten together.  I made ten card kits, so for now I'll save them - again, either using them for my own stamp group, or for the SA group if we do reschedule (I sure hope we do).  Here it is:


The sentiment stamp is from Teeny Tiny Wishes.  Thanks, as always, for taking time out of your day to come visit my blog!

Blog Hop Sneak Peak

You'll want to be sure to stop back by here tomorrow, July 30, to see what I'm going to share as part of my stop on the Stampin' Addicts Mega Blog Hop, featuring new stamp sets from the new Idea Book & Catalog.  The hop will continue all weekend so you'll have plenty of time to visit all of the blogs and see what the talented folks over at SA will be sharing with you.  I'm sharing projects created with the stamp set 'Friends Never Fade' as well as the new Greenhouse Gala designer series paper.  Here's a sneak peak:


I just love Marina Mist, Pear Pizzazz and Chocolate Chip together!!  Hope to see you back here sometime over the weekend so I can share with you what else I made for the blog hop.

Wednesday, July 28, 2010

Technique Card: Black Magic With a Twist

I had planned to share the Black Magic with a Twist technique with the CA non-convention goers this past weekend, so since the event was canceled, I'll share it with you today!  I know it's been used A LOT, but I started out by stamping the coneflowers from Inspired by Nature in white craft ink onto black card stock.  After letting it dry, I grabbed my watercolor pencils and got busy coloring.  You simply color over the dried white ink, adding shading to the image.  You can then either use the image as is for a project, or you can jazz it up by using a white gel pen to outline all or part of your image.  I got a bit carried away with the dots on mine, but I still like how it turned out.  I turned it into a card, which I prestamped for the gals - all they'd have had to do would be to color the image, adhere it to the card, and add ribbon.  I made eight card kits, so I'll save them in case we do get together later.  Otherwise, I'll use it for one of my own stamp camps in the fall.  Here's how it turned out:


Once again, I'm photographing my stuff late at night, but I think you get the idea.  I used the polka dot embossing folder, and the sentiment is from a new set called Perfect Punches.  The card once again started out as a Mojo Monday sketch (an old one) that got modified as I played with it.  I thank you for stopping by and hope you have a great day!

Tuesday, July 27, 2010

Happy Anniversary...

...to my dear husband of 19 years today!  I've had in mind what I wanted to make for his anniversary card, but it took a while to get it all together.  It started out as a Mojo Monday sketch:


I saw Mike Funke's submission for this sketch, which inspired the card I made for my DH.  I deviated from the sketch a little, but overall I'm really happy with the card.  Our wedding colors where black, red and white, so I wanted to use them on his card.  I hope he likes it!

Monday, July 26, 2010

Swap Card

I posted a sneak peak of the swap card I had ready for the get-together that was canceled, so I thought I'd share it with you now.  As I mentioned earlier, this is a card my upline had for us to make at her June Tropical Party stamp camp.  I just swapped out the Chocolate Chip card stock and ribbon, using Early Espresso for mine.  I made a dozen of these in all, knowing I'd want to have a few extras to use myself.  Here it is:


A little blurry, but you get the idea.  I don't know why, but I just love this card!  Thanks for taking time out of your day today to stop by!

Sunday, July 25, 2010

Black Magic... Without the Twist

Hello there!  One of the cards I am going to share with you later this week is a card I created to showcase the Black Magic with a Twist technique.  The Black Magic technique itself can create some stunning images.  I'm not the greatest when it comes to shading, but here's one of the samples I was going to share with the gals last Saturday:


I started by stamping the image onto Basic Black card stock, using craft white ink, leaving it to sit for a while to dry.  Once it was completely dry, I used my watercolor pencils to color over the image, starting with the lighter yellow shade, and adding the darker to highlight.  I did the same with the flower centers.  The stems are all the same color - just colored more darkly in spots to create highlighting.  What's important is to get a nice stamped image to start with.  This one was a little uneven on the right side of the two flowers (the ink was a little blotchy, not as smooth as it was for the rest of the image), and you can see that the coloring here isn't as smooth as a result.

This was all I'd originally planned to have the gals do, but I ended up designing a quick card to go with it, which I'll be sharing with you later this week.  I know Inspired by Nature has been used A LOT, but I don't think I'll ever get tired of it - it's one of those stamp sets that I'll never part with. 

Well, the weekend is winding down, but be sure to stop back by each day this next week - I actually have five posts scheduled to go during the week (amazing for me to post that often!).  Hope to see you later!

Hawaiian Treat Bag

While we were on vacation in Hawai'i, I decided to go to the Stampin' Addicts' CA Non-Convention Goers get-together.  Unfortunately, it was canceled when too many who thought they'd be able to make it couldn't.  I already had everything ready to go, one of which was this treat bag.  On our way home (at the Kona airport), I picked up two bags of Hershey's Kisses with Mauna Loa Macadamia Nuts.  Another Stampin' Addict, Mary Brown, had posted a cute box and note cards as part of the monthly Control Freaks blog hop a couple of months back.  My upline took that idea and created a full-size card with it for her June stamp camp, which I attended.  I got the idea to use Mary's design as a bag topper, and this is what I had planned to give the gals at our get-together:


I made about a dozen of them, so I'm not sure what I'm going to do with them all as I'm not sure how long they'll keep.  I may pass them out at my own first stamp camp once the school year starts up again, unless the SA gals get another get-together planned for the near future.  Thanks for stopping by today - stay cool!

Lookie What I Got Today!

I've always wanted a Scor-Pal, and was hoping that Stampin' Up! would someday sell them (alas, they still don't).  Well, earlier this summer, I saw that a cardmaker's Scor-Pal, called the Scor-Buddy, was out.  They flew off the shelves, so by the time I found out about it, they were on backorder.  I went ahead and placed an order for one, and it came today (well, ok, it came on Saturday!).  I already had a use for it - one of the cards I made for the upcoming Stampin' Addicts Mega Blog Hop featuring stamp sets from the new Idea Book & Catalog.  Can't show the card yet, but I can show you my new toy:


I comes with a really nice zippered pouch, too!  I've already used it a couple of times today - it's a great size, portable enough to take with you to workshops/stamp camps.  Love it!

Thursday, July 22, 2010

Bummer!!

Well, the CA Non-Convention Goers gathering is off, and I'm totally bummed!  We started with 10 interested in the event originally, but four have had to drop out, so yesterday it was decided to cancel the event (with the hopes that we could do something in the future with more of us attending).  I'm bummed because I spent quite a bit of time over the past two weeks making my swaps, getting my shoebox swap together, making a special treat for my fellow stampers, and putting together a demo - black magic with a twist, which I ended up creating a card for them to quickly put together after having fun with the technique.  So, I've been taking out my frustration by shredding a couple of bags worth of old paperwork that's been taking up space in my craft room.  Still have a little to go, but the shredders have overheated, so I'm done for the time being.  Guess I'll spend the day on Saturday cleaning so that hopefully I will actually be able to sit in my chair at my desk and stamp something by the end of the weekend.  I need to work on my blog hop projects, anyhow.

Saturday, July 17, 2010

Sneak Peaks

I've been busy over the past week making two cards for the Stampin' Addicts California Non-Convention Goers gathering next Saturday over in West LA.  I can't show you what I made yet, as a few of the gals I'm getting together with next weekend also visit my blog, but I can show you a sneak peak!

We're doing a general swap, so this is a sneak peek of the card I made to trade.  It's not my original design, but instead a card I made last month at my upline's monthly stamp camp.  I just updated the colors she used by swapping the Chocolate Chip card stock and ribbon on hers to Early Espresso on mine, and changed the Whisper White on hers to Very Vanilla on mine.  I made ten of these babies this week, although I'm only going to need six for our gathering.  Here's a look:


We're also doing a shoebox swap.  I've been trying to decide all week what I wanted to do for this one.  Last night I was playing around with some supplies, and today after looking through some old Mojo Monday sketches, it all came together.  I've got my sample card finished now, and all I have to do is cut up card stock and gather the supplies needed to make the card.  This one also uses some of our new colors.  You might spot Daffodil Delight and Pear Pizzazz in the sneak peek:


Like that knot?  Another thing I did this week was watch some YouTube videos on tying knots in ribbon.  I don't know about you, but it often takes me four or five attempts (or sometimes more) to get a good knot tied in the ribbon.  After watching a couple of videos, now it only takes me two or three!  Sometimes I even get lucky and get it right on the first try.

Ok, that's it for the sneak peeks - stop by next weekend and I'll show you both cards in their entirety!

Wednesday, July 14, 2010

Mark Your Calendars...


I'm participating in a Blog Hop featuring creations made with products from the NEW Stampin' Up! Idea Book and Catalog.  As the graphic above indicates, the blog hop will take place from July 30 through August 1.  There will be 20+ stops on this blog hop, with a whole weekend for you to visit them all.  I'll be featuring the new Friends Never Fade stamp set along with the coordinating Greenhouse Gala designer series paper.  I hope you'll come back and join me between July 30 and August 1 to see all of the cool creations made by the ladies and gents from stampinaddicts.com!

Saturday, July 10, 2010

Reorganized Brads!

I mentioned in the last post that I did some color reorganization last night.  Since I sorted my brads into two of the old containers that have the four dividers in them, I needed to re-label the containers.  Tonight, I made the labels for my containers using My Digital Studio.  I started with a circle punch, sizing it to be punched out with the 1 3/4 inch circle punch, and then I added a black mat around it.  I used the Designer Series Papers Background called Mini Project Boxes - Pattern 1 to fill in the round punch, then typed in the info about the brads using the Arial font.  I had some sticker paper, so I printed out the labels on it, then punched them out.  The tough part was peeling off the label backing to stick them onto the old container lids.  What do you think?  Oh, and I finally managed to sort those metallic ones.  It was bad enough separating the gold and silver - try doing that with pewter and antique brass!  YIKES!

Back from vacation...

We got back from our wonderful trip Friday morning, and after taking a nap (couldn't sleep on the overnight plane ride), I went to my local UPS Store to get my mail, and guess what was waiting for me?  My first order from the new Idea Book and Catalog!  Yay!  So, what did I do first?  Organization.  I hadn't gone through my ink pads to reorganize them according to the new color scheme, so that's what I did first, followed by reorganizing the reinkers.

I've kept all of my In Color pads, so I moved the ones that made it into the new color palate, and then pulled out the rest.  Between those and the retired colors that were in my ink pad carousel, I have 48 retired ink pads.  When I think how much I spent to get all of them, it's kinda sad.  I'm not one that sticks to new product only, so they'll get used, but they're being reorganized in alphabetical order and set aside from my current pads.  I have some plastic containers where I keep my reinkers, so I sorted the retired ones from the duplicates of current colors - just need to label the containers now.  Need to do that with the paper next, but that's a major undertaking and I'm not sure how I'm going to store the retired paper yet, so it can wait until I figure it out.

Then I started with the brads.  I ordered one set of each of the new color brads.  I do NOT like how they're packaged - six colors, all mixed together, so guess what I did?  I grabbed some empty containers that had the dividers in them, and got them all separated.  Now I just need to label the lids.  The new brads have a powdery finish instead of glossy (I like the new finish better), so when I went through my old brads, even though on a few there's quite a color difference (Tempting Turquoise and Certainly Celery, for example), I put them all together.  I did cheat - we still have Bashful Blue and Always Artichoke in our color palate, so even though the new brads don't come in those colors, I still put my old ones with the new color family they go with.  Then I tried working on the metallics.  Mind you, it's now after midnight, and I'm sitting at the dining room table trying to sort these dang things.  Do you know how hard it is to tell the difference between silver and gold, pewter and antique brass?  I had to set them aside for daylight sorting. 

Tonight I'll tackle the markers and maybe ribbon.  I overall like the new color scheme, but it sure required a lot of work!  Last time SU! did a color revamp, I was just getting into stamping (Handsome Hunter was the newest color when I caught the stampin' fever), I didn't have a ton of stuff, so it was easy.  This has been a tougher transition.

Perhaps early next week I'll have something new to share - I'll probably ink up the Friends Never Fade set that arrived three days after we left on vacation.  Take care all!

Monday, July 5, 2010

Ornate Bloom

Aloha from the Big Island!  We're here for a couple more days before having to head back home :(.  I managed to find a little bit of time today to play, and this is what I came up with.  A pretty simple card, and the only stamping on it is the sentiment.  I actually had to do a little bit of fixup on it, as I tried to paper pierce a row under the sentiment, and the plastic guide from the mat pack slipped and my line was VERY crooked.  So, I added the thin Chocolate and Pumpkin strips on the bottom where I messed up.  I think the little bit of Pumpkin there really works, so maybe I really didn't mess up at all!  Anyway, here it is:


Ended up watching a young turtle for a good half hour or so this afternoon.  He/she found a nice clump of vegetation along the rocks out front and was having him/herself some dinner.  Hoped to get a shot of him/her with his/her head up, but I just wasn't fast enough.  Here he/she is:


Thanks for stopping by!

Saturday, July 3, 2010

Scrapbooking Inspired by a Card

I was looking at the Watercolor Trio card I made while on Maui, and decided that after dinner tonight, I'd make a 6x6 scrapbook spread using the same papers/colors.  Here's what I came up with:


It uses the Greenhouse Gala designer series paper that I'm loving right now, along with Marina Mist for the base card stock, stamped with a flower image from the new level 2 hostess set, Fast & Fabulous.  I pierced a piece of Marina Mist using the mat pack and did faux stitching using a white gel pen.  I still felt it needed something, so I added the thin strip of Chocolate Chip between the stitching.  5/8 inch Chocolate Chip ribbon finishes it off.  Hope you like it!

Gecko Sighting

On the way up from the pool tonight, the girls and I spied this beautiful gecko by the elevator on our floor.  I quickly got my camera from the condo we're renting and he/she was still on the wall, so I was able to get a couple of shots.  Isn't he/she cute?

Non-SU! Scrapbooking

While on Maui, my dear hubby took me to the scrapbook store, Island Paperie.  I picked out a few tropical papers and some card stock and ended up creating the following simple layouts for a 6x6 scrapbook I'm working on for our trip.  It was fun to spend some time scrapbooking for a change!  Here are a few of the pages I've created so far:


I have a few more tropical papers to create pages with, so I'll likely have another page or so to share with you before we head back home from our trip.  Mahalo for stopping by!

Friday, July 2, 2010

Not Much Stampin' Goin' On...

Aloha from the Big Island!  Phase 2 of our Hawaiian vacation began June 30.  Haven't done any stamping here (YET), as I've been too busy looking over the online version of the new Stampin' Up! Idea Book and Catalog (left my paper copy at home).  I started to work on my first order, and quickly had it up to $700 - yikes!  Way more than I can afford this summer, so will need to look at taming the list down a bit (by like half).  It's really tough with all the new colors, ribbons, and storage ideas.  I need to NOT buy any stamp sets - I have a ton already that I don't use - but I DO want to stock up on the new color ink pads and reinkers, plus paper, designer paper and coordinating things like brads and ribbon - but that still makes it rather costly!  I'll likely get it down to $400 so I get some good hostess benefits out of it all, but that's still a HUGE order for me!  It's also tough considering I spent a lot in June with the preorder items we demos had access to.  I'm in no big hurry since we're here in Hawaii for a while longer, but it would be nice to get it ordered in the hopes that it would be there when we get home, right?  I hope to finalize some of our activities over the next few days - then I can pull out the stamps and paper and PLAY!  Thanks for stopping by.